Date: 12/16/2010, 12:30 am
I tend to look for a cheap way to do things, and I did not wish to spend large dollars on clamps. I had used inner tube rubber effectively for clamping during guitar construction, so I figured that the humble inner tube should be useful in kayak building as well. Turns out that it is.
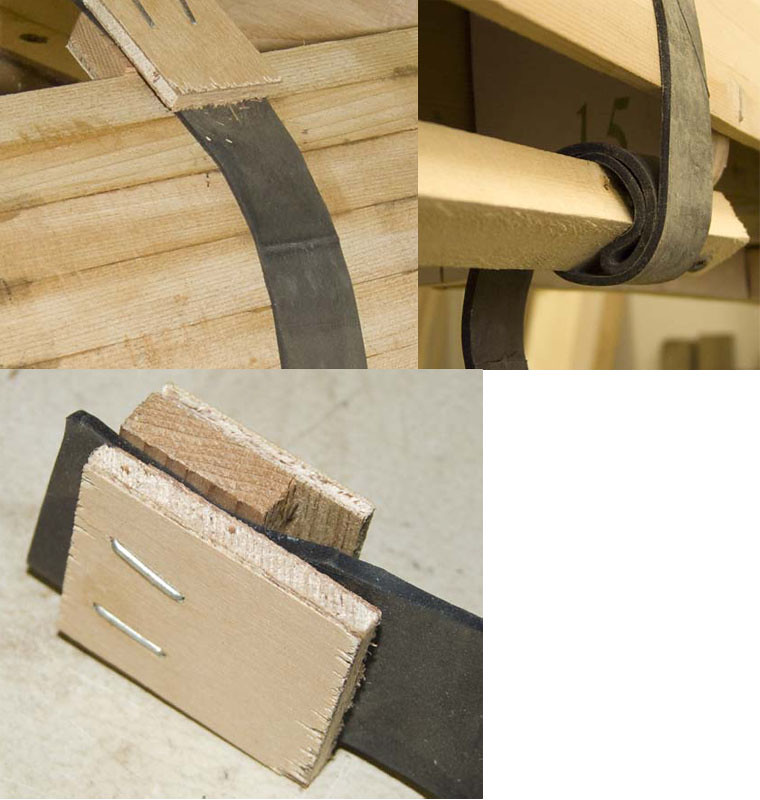
The picture shows the main way I use them. For the hull, I mount a rail directly to the station forms beneath the sheer strips, and use that to anchor the rubber strips. If you try this, make sure that the rail is either kerfed or done in separate pieces between stations or the stiffness of the rails could distort the alignment of your forms.
The wooden "hooks" stapled to the end do a good job of applying pressure nicely on the square strip edges, and since the rubber lies snug to the hull, the clamping pressure produces very little force tending to pull the strips out of fair alignment. If you use bead and cove, the center cedar piece could be shaped accordingly. I also use rubber strips without hooks where handy, for example while installing the first couple strips above the sheer strips. I just wrap the rubber around the two or three cedar strips involved, and this avoids pulling the sheer strips out of fair.
To make the rubber strips, hie ye forth down to the local tire shop and beg a dead truck tube. Use a straight edge and utility knife to slice off rubber bands about 1 1/4" wide, then cut the bands into strips by cutting them through at one point. After a couple "rubber bands" are cut off tube, cut off a waste triangle to keep your cut lines going more or less through the center of the tube outline. One tube will make a significant pile of bands. I used about sixty of them.
To make the wood hooks, I just rounded up some scrap thin plywood, and sandwiched a piece of scrap cedar between them. The pieces lend themselves nicely to making a pile of them very quickly. I used an air stapler to put the pieces together, but screws or tacks might also work. I ended up using three staples on each side of the "hook" (the photo shows only two, which I later discovered would permit the hook to pull apart under strong pressure), and made sure that the thickness of the pieces permitted the staples to penetrate the rubber from both sides. The rubber will rip off once in a while, so having some extra wood bits can be handy.
The photo shows the main way to anchor the rubber to the clamp rail; one turn around the rail, and tuck the bight under the stretched band. Friction is your friend with this and lots of other configurations. The rubber in the photo is loose to show the "knot", but this arrangement allows more or less instant installation under considerable tension. Leave enough room for fingers between the clamp rail and the sheer strip.
I found having a serious pile of easily installed clamps quite handy.

Messages In This Thread
- Strip: inner tube strip clamps *PIC*
Al Edie -- 12/16/2010, 12:30 am- Re: Strip: inner tube strip clamps
Ian Cummins -- 12/16/2010, 11:26 am- Re: Strip: inner tube strip clamps
J Law -- 12/16/2010, 6:31 am- Re: Strip: inner tube strip clamps
Paul Montgomery -- 12/16/2010, 7:22 am- Re: Strip: inner tube strip clamps
James Hanrahan -- 12/16/2010, 8:51 am- Re: Strip: inner tube strip clamps
george jung -- 12/16/2010, 9:57 am
- Re: Strip: inner tube strip clamps
- Re: Strip: inner tube strip clamps
- Re: Strip: inner tube strip clamps
- Re: Strip: inner tube strip clamps


