Date: 12/16/2010, 11:10 pm
Another evening, another couple ideas that may be useful to someone. :)
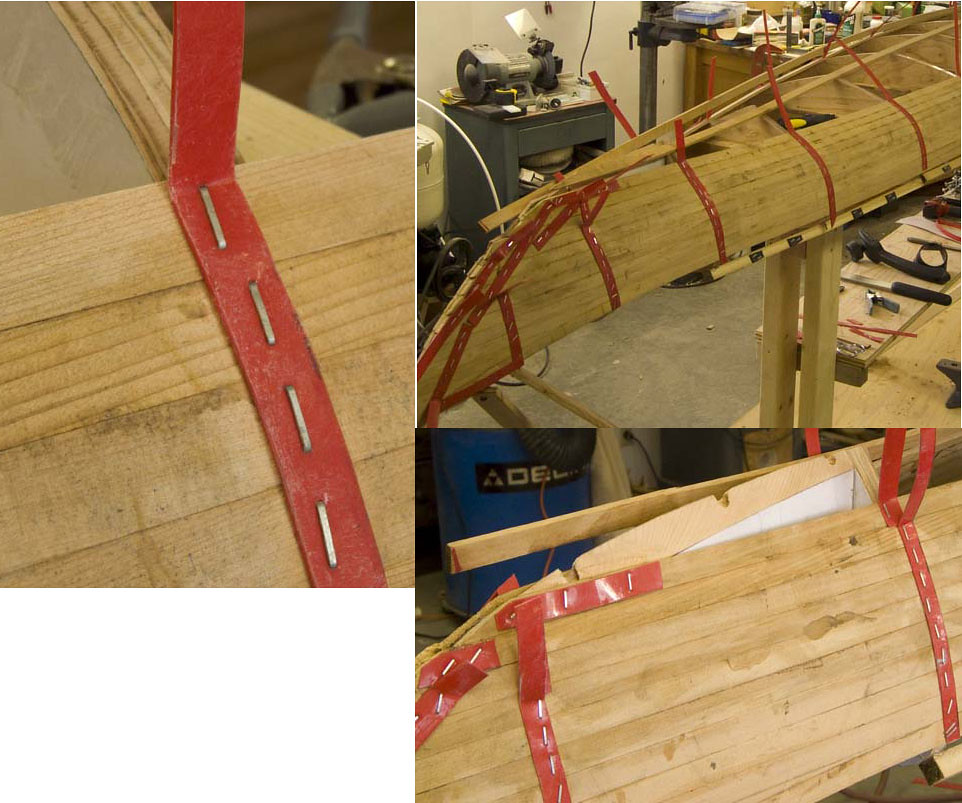
The attached photo shows the protector strips that I use under my staples. The plastic strips protect the cedar from damage from the staples or the stapler. They also hugely facilitate removal of the staples. Usually, grabbing an end with pliers and pulling cleanly removes an entire line of staples like unzipping a zipper. Once in a while the plastic breaks, but I just grab the broken end and continue.
This is not a new idea, I have read of others using strips of some sort in a similar manner. What may be new and helpful is the material I use - it is pieces of the plastic sheets sold as devices for children to use for sliding on snow. The plastic is thin enough to not waste staple length, is just strong enough to pull staples, and glue does not stick to it at all. And it is cheap. One "slider" will do several kayaks, and as I recall they might cost less than ten bucks. I cut it into strips with a utility knife and straight edge.
Once in a while the staple will dent the cedar under the plastic strip (I use an air stapler), but unlike staples set too deeply into bare wood, the dents are smoothly bounded concavities with no real damage to the wood, and the plastic enables removal of the staple without digging into the wood to get beneath the staple. To remove any dents, I wet them, place a wet rag over them, and hit the rag with a steam iron hot enough to make the wet rag sizzle. I use the same process to close staple holes. This trick will completely remove quite impressive dents, and sometimes closes staple holes so tight that they nearly disappear.
The lower right photo sort of shows how I install an internal stem. The stem pattern (the paper print-out that is part of most plans) includes a line which specifies the location to which the knife edge must be tapered in order for the cedar strips to lie fair along the tapered surface of the stem form. I cut the plywood station on this line, thereby removing a curved chunk of plywood from the leading edge of the form. I then cut an identical size and shape of cedar, screw it onto the leading edge of the form, thereby replacing the chunk of plywood that I removed. I then use a belt sander to taper the cedar from where it meets the form to the leading knife edge. I install packing tape under the cedar to prevent it from being glued down to the form during strip gluing, and (this is important) remove the screws as the cedar strips are about to cover the holes up. Leaving a screw in would be inconvenient... This worked well on my One Ocean plans, but there is no guarantee that the trim lines on other plans will result in a fair glue seat for strips. I have read of others who actually taper the internal stem as strips are applied in order to match the taper to fair alignment of the strips.
After all the cedar strips are installed, I use a belt sander to remove cedar just until I expose a bit of the leading edge of the internal stem, and then glue on a small laminated external stem of hardwood for durability.
I installed an internal stem for a couple reasons. First, I figured it would substantially strengthen the entire stem assembly. Second, I intend to shape the internal surface of the stem so as to avoid the need for epoxy fairing in the acute angle between the cedar strips. Once shaped, the internal stem should allow fiberglass to seat easily without adding weight with epoxy and filler.

Messages In This Thread
- Strip: Stapling materials/internal stem *PIC*
Al Edie -- 12/16/2010, 11:10 pm- Re: Strip: Stapling materials/internal stem *PIC*
JohnCaldeira -- 12/17/2010, 2:10 pm- Re: Strip: Stapling materials/internal stem
Al Edie -- 12/18/2010, 12:07 pm
- Re: Strip: Stapling materials/internal stem
- Re: Strip: Stapling materials/internal stem *PIC*


